Description
Our goal is to monitor the health and the performance of a Cisco MDS 9020 Fabric Switch. A SAN is just a network and the switch is its heart. As such, it represents the most critical part of a storage infrastructure. By monitoring a SAN switch, we are able to detect any connectivity issue on the hosts, the switches, the disk arrays and the tape libraries and are able to diagnose bottlenecks, multipath setups. We can also for example identify which servers are very demanding, which disk array is under hard pressure and the impact of the nightly backups.
Warning! This article covers only the Cisco MDS 9020 Fabric switch, excluding all other Cisco SAN switches, like Cisco MDS 9000, 9100, 9200 and 9500 Series, which are covered in another article.
Note: This article applies to Cisco MDS 9020 Fabric Switches as well as to their equivalent OE'ed by other manufacturers, notably HP and IBM.
Solution
Cisco MDS 9020 Fabric Switch instrumentation
Our solution will rely on the SNMP agent of FabricWare of the Cisco switch. The Cisco MDS agent is based on the Fiber Alliance Management MIB (FCMGMT-MIB).
Monitoring features
Once properly installed and configured, our solution will constantly monitor the following metrics on the Cisco MDS switch.
- Status of each temperature sensor
- OK
- Warning
- Alarm
- Status of each fan
- OK
- Warning
- Alarm
- Status of each power supply
- OK
- Warning
- Alarm
- The type of each FC port
- Hub
- Node (N)
- Public Loop (NL)
- Fabric Loop (FL)
- Fabric (F)
- Expansion (E)
- General (G)
- The WWN address of each port, as well as the WWN of the remote port it is connected to
- The status of each SFP (represented with the Status parameter)
- Failed
- FCAL bypass, Loop only
- Connected
- External Loopback
- Transmitter Fault
- No Media
- Link Down
- The link status of each port (LinkStatus parameter, which triggers a warning when a connected port loses its connection (default behavior))
- The speed of each port (LinkSpeed parameter, which triggers a warning when the negotiated speed downgrades to a slower speed (default behavior))
- The traffic on each port
- BandwidthUtilization (%)
- ReceivedBytesRate (MB/sec)
- TransmittedBytesRate (MB/sec)
- ReceivedPacketsRate (Packets/sec)
- TransmittedPacketsRate (Packets/sec)
- The percentage of reception and transmission errors on the link (ErrorPercent parameter)
Since the traffic is being monitored constantly and stored in a history graph, reports are also available on demand on any time period in hourly and daily formats, in GB/hour or GB/day.
Pre-requisites
SNMP must have been enabled on the Cisco MDS switch. This can be done by connecting to the switch in SSH or telnet and using the following commands:
cisco-san-01#
cisco-san-01# config
Enter configuration commands, one per line.
cisco-san-01(config)# snmp-server community public ro
cisco-san-01(config)#
Setting up Hardware Sentry KM 1.6.00 to monitor a Cisco MDS 9020 Fabric Switch
Additional pre-requisites
You need a fully working BMC PATROL environment:
- PATROL Agent on a system with a network access to the Cisco MDS 9020 Fabric Switch (version 3.5 minimum). The system does not need to be part of the SAN.
- PATROL Console (Classic or Central)
Principle
Hardware Sentry KM will run on a system (any server, workstation or virtual machine with network access to the Cisco MDS switch) and monitors the hardware of this system. We need to configure Hardware Sentry KM to connect to the Cisco switch to monitor it.
Install Hardware Sentry KM
- Download the Hardware Sentry KM package and the Installation Utility.
- Install the KM on top of the PATROL Agent.
- Install the KM on the Console Classic, Console Server, and PATROL Central Web Edition if it hasn't been done already.
- Follow the instructions of the Hardware Sentry KM Installation Guide.
- Load Hardware Sentry KM in the PATROL Console (MS_HARDWARE_SENTRY1.kml).
Configure Hardware Sentry KM
Once installed and loaded, Hardware Sentry KM starts automatically to monitor the system it is running on, even though it's not what we are interested in here.
To configure Hardware Sentry KM to connect to Cisco MDS switch:
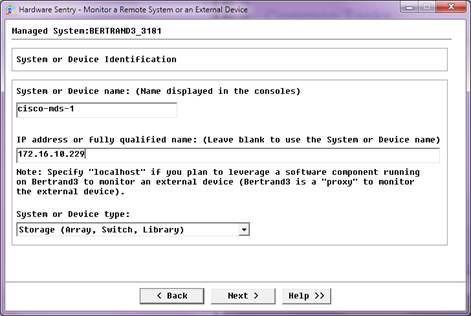
- [Right-click] on the main “Hardware” icon in the PATROL Console › [KM Commands] › [Add a Remote System or an External Device…]
- Accept the Software License Agreement and click [Next]
- Enter the name of the Cisco MDS 9020 Fabric switch to monitor
- Enter its IP address or hostname if it is different from the name specified above
- Choose the “Storage (Array, Switch, Library)” option for the system type and click [Next]
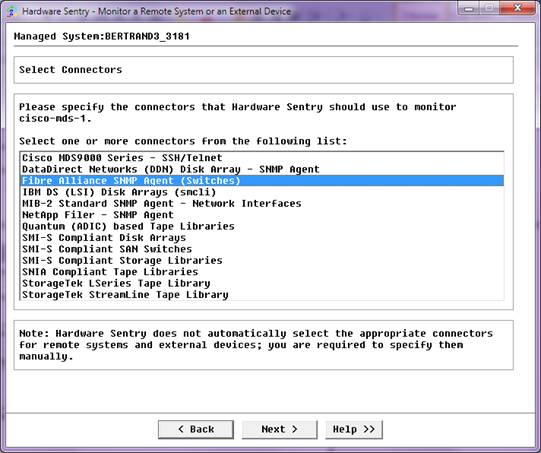
- Select the Fibre Alliance SNMP Agent (Switches) in the connector list
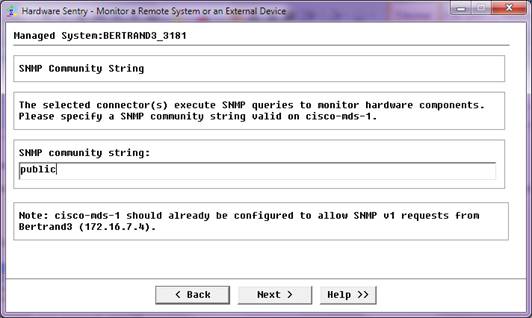
- Enter the SNMP community string that has read privileges on the switch (this has been configured in the Cisco Web-based management interface earlier). Click [Next] and then [Finish].
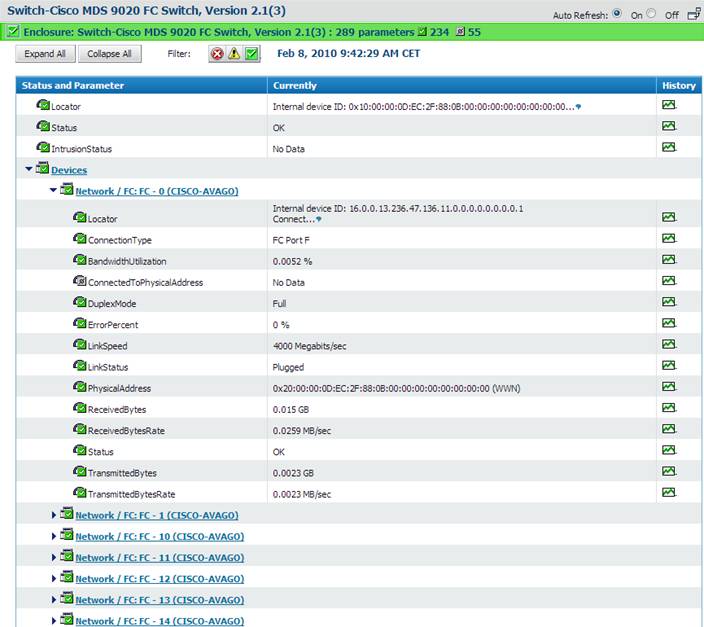
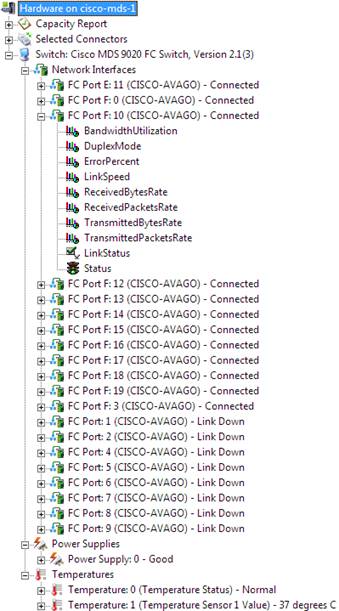
In the PATROL Console, the hardware monitoring should look like:
Setting up BMC Performance Manager Express for Hardware 2.7.00 to monitor a Cisco MDS 9020 Fabric Switch
Additional pre-requisites
You need a fully working BMC Performance Manager Portal environment:
- BMC Portal (minimum 2.5.00, recommended 2.7.00)
- BMC Performance Manager Express for Hardware 2.7.00 (or higher) properly uploaded and published using the superadmin credentials
Principle
Create an Element for the Cisco MDS switch.
Load and configure BMC Performance Manager Express for Hardware on this element.
Configure BMC Performance Manager Express for Hardware
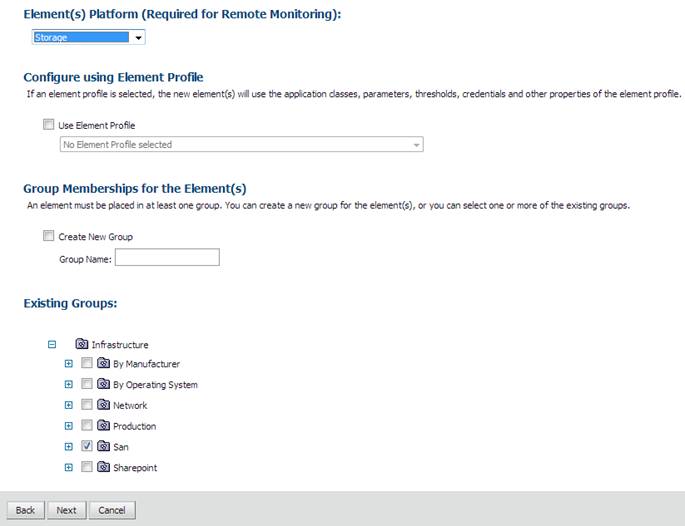
- In the “Configure” tab, add an “Element” (Infrastructure Element)
- Select the appropriate RSM
- Enter the name of the element for the Cisco MDS switch and specify either its hostname of IP address
- Select “Storage” as the Element Platform and select the appropriate group
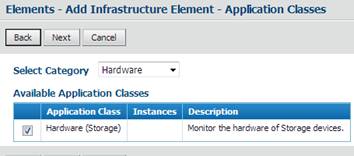
- Select the “Hardware” category and check the box corresponding to “Hardware (Storage)” application class
- Enter the SNMP credentials to connect to the Cisco MDS switch (SNMP version 1 and the community)
- No other credentials need to be specified
- Leave all of the thresholds to their default values and click [Finish].
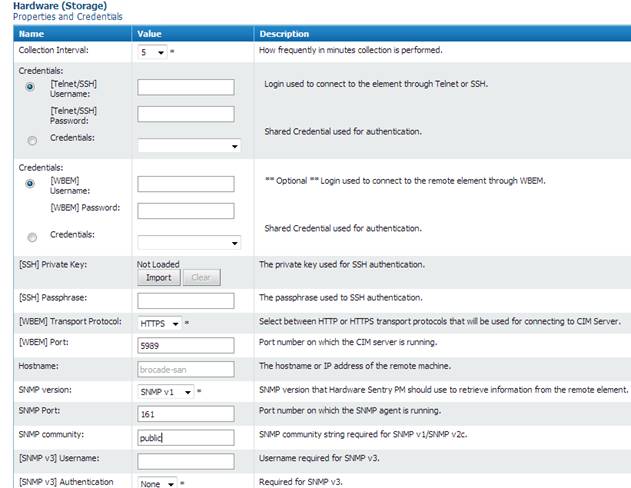
Warning! It is very important to wait for the threshold page to load completely before hitting the [Finish] button. Otherwise, alert thresholds may be left unset, which can cause missed alerts!
In BMC Portal, the monitoring of the Cisco MDS switch should look like: