Description
This article explains how to integrate the events generated by the Sentry Software's KMs into BMC Event Manager (BEM).
Procedure
The procedure will differ depending on your PATROL architecture. Please refer to the table below to know which method should be used.
| PATROL Architecture | Method to be Used |
| PATROL 7 | BMC Impact Integration for PATROL v7 |
| PATROL 3 | BMC Impact Integration for PATROL V3 (MCXP) |
| PATROL Agent 9.0 | Wpconfig (Events will be directly sent to cells) |
Using BMC Impact Integration for PATROL v.7
To integrate the events generated by the KMs into BMC Event Manager, you need to set up a management profile with the BMC II for PATROL configuration utility. This management profile specifies the PATROL Agent, the Common Connect clients, and the events to monitor.
To set up a Management Profile:
- Start the Common Connect Configuration utility:
- In Microsoft Windows Explorer, go to the CC_HOME\bin\Windows-x86 directory, and double-click configstart.bat.
- For Solaris, change directory to CC_HOME/bin/platform_operating_system, and locate the configstart.sh file. From the specified path, enter ./configstart.sh and press Enter.
- Add a managed system:
- Right-click Managed PATROL Systems and click the Add New menu command
- Select the managed systems to monitor and click Next
- Click Finish.
- Load the Sentry Software’s KMs:
- Right-click the Managed Systems and click the Load KMs menu command
- Select the required KMs
- Click Next
- Click Finish
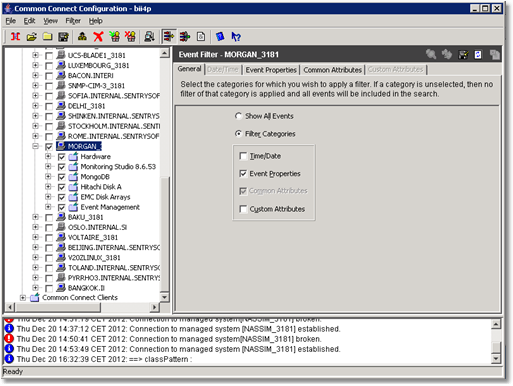
- (Optional) Configure the Event Filters to specify the events that will be sent to cells.

- Save your management profile.
- Configure the startup options:
- In the CC_HOME\etc directory, edit the bii4p_start.opts file
- Specify the Management Profile that you previously configured (“bii4p” in the example below):
-mprofile bii4p
-rtserver tcp:consolesrv:2059
-cserver CONSOLESRV
-cell Bii4p7
-instance
-imConfFile bii4p.conf
-debug 1
-cfgid
-virtualName
-client
-updmcueid
-FQDNConfigured
-refreshAgentState
-agentRestartDelayTime
-mcueidHostName
-cserverConnectionTimeOutIMPORTANT: Entries in the bii4p_start.opts file are case-sensitive for both Windows and UNIX.Save the bii4p_start.opts file
- Save the bii4p_start.opts file
- Start bii4p
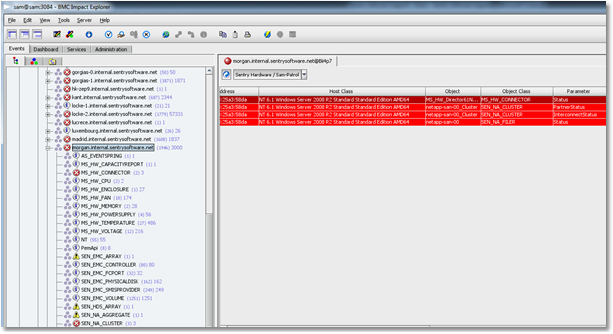
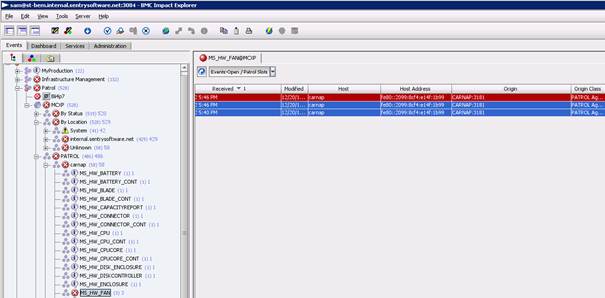
- Open BMC Impact Explorer and check that the events generated by the Sentry Software’s KMs actually appear.
For more information about BMC Impact Integration for PATROL v.7, please refer to the product installation and configuration guide.
Using BMC Impact Integration for PATROL v.3 (MCXP)
With PATROL Classic, you need to create the mcxpagent.conf configuration file in which all the information about the PATROL Agents will be stored. You can use the BMC II for PATROL discovery tool, mcxpconfig, to populate configuration information in the mcxpagent.conf file:
- Run the mcxpconfig discovery tool located in %MCELL_HOME%\bin\ to discover all the PATROL Agents. The options and syntax available are as follows:
mcxpconfig [-h] [-z] [-b ConfigFile] [-e | -a Host [[-o] [-s] [-p port] [-t timeout]]]
mcxpconfig will automatically discover the PATROL Agents if any combination of the options -a, -p and -s is used. The:
- -a option is required to identify the host name or IP address that the tool must scan in search of PATROL Agents.
- The -p option identifies the port or the port range to scan on the computer identified in the -a option. If you do not use the -p option, the tool scans port 3181
- The -s option enables a search of all hosts on the subnet on which the specified computer resides.
- When mcxpconfig discovers PATROL Agents, it requests a logon ID and password for each agent.
- When all logon ID and password information has been collected, the autodiscovery tool generates the mcxpagent.conf file. Here is an example:
D:\BMC\Impact\server\bin>mcxpconfig.exe -a morgan -p 3181The configuration file for Agents, mcxpagent.conf has been created.
BMC Impact Mcxpconfig 3.1.20 (Build 999911 - 12-Apr-2011)
Copyright 1998-2010 BMC Software, Inc. as an unpublished work. All rights reserved.
Configuration of the agent in the host: morgan.internal.sentrysoftware.net port:
3181
Login (Default: ):
patrol
Password:
Please Confirm!
Password:
- Place the mcxpagent.conf file in the MCELL_HOME\etc directory.
- If required, edit the mcxpagent.conf file to add other agents. The format to use is as follows:
[Section 1]
Password = QFGBO0GAU195D606263005
Agent = morgan.internal.sentrysoftware.net:3181:patrol
Agent = gorgias-1.internal.sentrysoftware.net:3181:patrol
Agent = toland.internal.sentrysoftware.net:3181:patrol
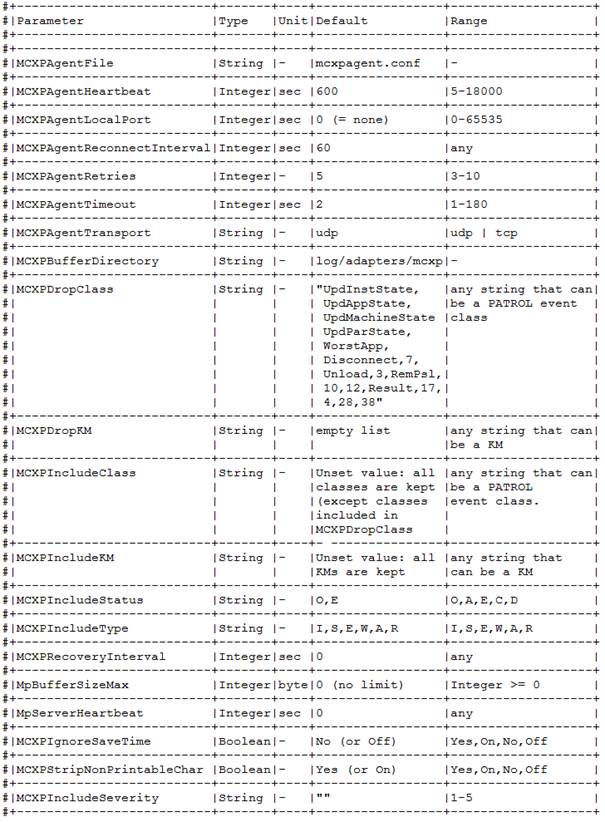
Agent = joao.internal.sentrysoftware.net:3181:patrol - Check the mcxp.conf file if you need to enable filters, change parameters, etc.
IMPORTANT: All the events generated by the KMs loaded on these PATROL Agents will be sent to the cell.
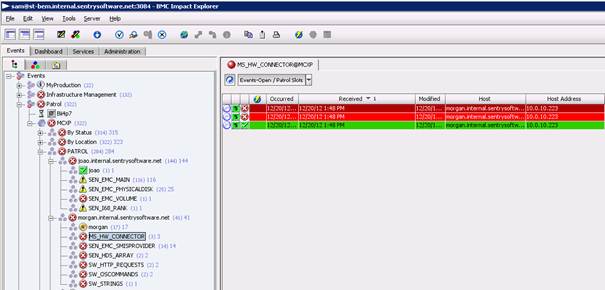
- Start BMC II for PATROL and check in BMC Impact Explorer that the events generated by the Sentry Software’s KMs actually appear
For more information about BMC Impact Integration for PATROL v.3, please refer to the user guide.
Using wpconfig
If you’re using PATROL Agent 9, events can be directly sent to cells. This may be configured either during the PATROL Agent installation phase or afterwards, through wpconfig:
- Run wpconfig
- In the Tree view, double-click the EventSetup > Configuration directory
- Set the Key and Primary variables with the encryption key and the host name and port of the cell
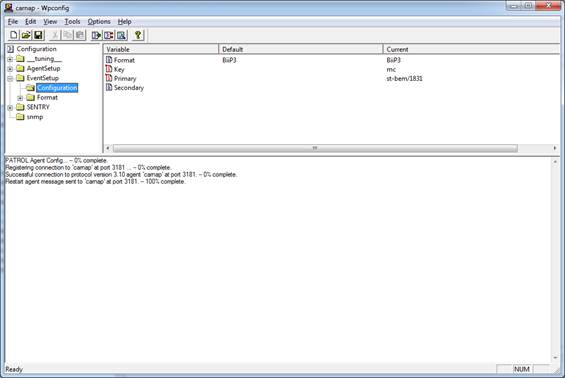
- Save your configuration
- Open BMC Impact Explorer and check that the events generated by the Sentry Software’s KMs actually appear.
Related Topics
- Generating Test Events with Hardware Sentry KM for PATROL
- Updating the mc_host and mc_host_address Slots of Sentry Class-41 Events in BEM with the Actual Hostname and IP Address of the Remotely Monitored System
- Managing Thresholds: the Event Management Thresholds Mechanism
- Handling PATROL Events of Class 11/41
- How to Generate Test PATROL_EV Events Using Monitoring Studio X